GPU Analytics Ep 2, Load some data from OmniSci into a GPU dataframe
Although the post title is about loading some data from a GPU database into a GPU dataframe, most of it is about running JupyterLab on a GPU AWS instance, which is a little bit cumbersome to set up. Finally, once JupyterLab is running on our p3.2xlarge instance, we are going to install RAPIDS cuDF and cuML libraries and perform a very short test.
Here is a brief description of cuDF and cuML:
Built based on the Apache Arrow columnar memory format, cuDF is a GPU DataFrame library for loading, joining, aggregating, filtering, and otherwise manipulating data.
cuML is a suite of libraries that implement machine learning algorithms and mathematical primitives functions that share compatible APIs with other RAPIDS projects.
Both libraries enable the use of GPUs in Python (without going into the details of CUDA programming).
This is the follow-up of our post GPU Analytics Ep 1, GPU installation of OmniSci on AWS. Thus we assume that we already created the GPU instance and installed OmniSci MapD Core database.
This JupyterLab part of this post is mostly inspired from two blog posts that I found usefull:
- This first one from Chris Albon
- This second one from François Chollet
By the way, each of these people happened to write a book that I found highly interesting, so let’s give the references to these fantastic books:
- Machine Learning with Python Cookbook, Chris Albon, O’Reilly Media, March 2018, ISBN 9781491989388, 366 pages
- Deep Learning with Python, François Chollet, Manning Publications, November 2017, ISBN 9781617294433, 384 pages
Run JupyterLab from our AWS GPU instance
The first step is to start the EC2 instance.

And then connect via ssh:
$ ssh -i ~/keys/EC2_nopass.pem ubuntu@ec2-34-243-80-83.eu-west-1.compute.amazonaws.com
ubuntu@ip-10-0-10-124:~$
Everything is fine, so let’s start by installing Anaconda, which we are going to use later to install the cuDF, cuML and related packages, and create a specific environment to play with these RAPIDS tools. From the Anaconda website:
The open-source Anaconda Distribution is the easiest way to perform Python/R data science and machine learning on Linux, Windows, and Mac OS X. With over 11 million users worldwide, it is the industry standard for developing, testing, and training on a single machine, …
Install Anaconda
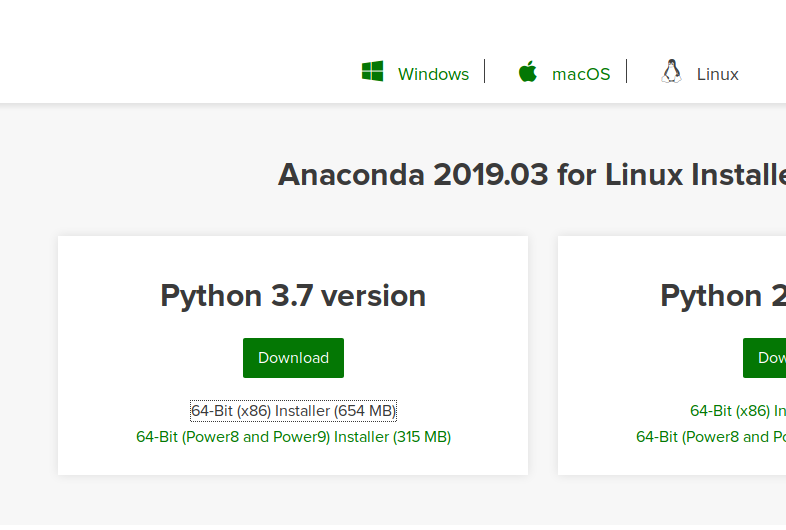
Let’s go to the Anaconda download page.

In the Anaconda 2019.03 for Linux Installer > Python 3.7 version frame, right-click on 64-Bit (x86) Installer (654 MB) and then Copy Link Location (At the time of my writing, the link is the following one: https://repo.anaconda.com/archive/Anaconda3-2019.03-Linux-x86_64.sh). We download this Anaconda3-2019.03-Linux-x86_64.sh script with wget:
ubuntu@ip-10-0-10-124:~$ wget https://repo.anaconda.com/archive/Anaconda3-2019.03-Linux-x86_64.sh
And then run it:
ubuntu@ip-10-0-10-124:~$ sh Anaconda3-2019.03-Linux-x86_64.sh
After accepting the licence terms, we:
- choose the installation location (actually the default one:
/home/ubuntu/anaconda3) - allow the installer to initialize
Anaconda3by runningconda init
After sourcing the .bashrc file, we can see that the prompt changed:
ubuntu@ip-10-0-10-124:~$ source ~/.bashrc
(base) ubuntu@ip-10-0-10-124:~$ which python
/home/ubuntu/anaconda3/bin/python
We are in the base conda environment. We see that the python command is now pointing toward the Anaconda distribution. We start by updating conda, in case it would not be the lastest version available:
(base) ubuntu@ip-10-0-10-124:~$ conda update conda
Jupyter is already installed in this env. Let’s create a password protection for Jupyter.
Create a password for Jupyter
Jupyter password protection is created with IPython (also already installed in this env):
(base) ubuntu@ip-10-0-10-124:~$ ipython
Python 3.7.3 (default, Mar 27 2019, 22:11:17)
Type 'copyright', 'credits' or 'license' for more information
IPython 7.4.0 -- An enhanced Interactive Python. Type '?' for help.

In [1]: from IPython.lib import passwd

In [2]: passwd()
Enter password:
Verify password:
Out[2]: 'sha1:e52fdcfe0fe4:88ec1a52b428exxxxxxxxxxxxxxf1a64d'

In [3]: exit
Create certificates for https
(base) ubuntu@ip-10-0-10-124:~/certs$ sudo openssl req -x509 -nodes -days 365 -newkey rsa:1024 -keyout "cert.key" -out "cert.pem" -batch
Generating a 1024 bit RSA private key
.......++++++
..........................++++++
writing new private key to 'cert.key'
-----
(base) ubuntu@ip-10-0-10-124:~/certs$ ls
cert.key  cert.pem
Create Jupyter config profile and configure
(base) ubuntu@ip-10-0-10-124:~/certs$ jupyter notebook --generate-config
Writing default config to: /home/ubuntu/.jupyter/jupyter_notebook_config.py
We are going to edit the Jupyter config file with vi, but you can use your favorite terminal editor…
(base) ubuntu@ip-10-0-10-124:~/certs$ cd ~/.jupyter/
(base) ubuntu@ip-10-0-10-124:~/.jupyter$ vi jupyter_notebook_config.py
# Configuration file for jupyter-notebook.

#------------------------------------------------------------------------------
# Application(SingletonConfigurable) configuration
#------------------------------------------------------------------------------

[...]
Now copy and paste the following lines in the config file:
# Configuration file for jupyter-notebook.

c = get_config()

# Kernel config
c.IPKernelApp.pylab = 'inline'  # if you want plotting support always in your notebook

# Notebook config
c.NotebookApp.certfile = u'/home/ubuntu/certs/cert.pem' # location of your certificate file
c.NotebookApp.keyfile = u'/home/ubuntu/certs/cert.key' # path to the certificate key we generated
c.NotebookApp.ip = '0.0.0.0'
c.NotebookApp.open_browser = False  # so that the ipython notebook does not opens up a browser by default
c.NotebookApp.password = u'sha1:e52fdcfe0fe4:88ec1a52b428exxxxxxxxxxxxxxf1a64d'  # the encrypted password we generated above
# Set the port to 8888, the port we set up in the AWS EC2 set-up
c.NotebookApp.port = 8888
Press:
ifor insert- Ctrl+c to copy
- Ctrl+Shift+v to paste in the config file (don’t forget to change the encrypted password!!!)
- Esc and then
:wqto save and exit from the config file.
Change the inbounds rules of the instance security group
In the past section, we set up the 8888 port for Jupyter. Now we are going to create a specific inbound rule for the instance, so that we can connect from the local browser to the jupyter server on AWS. We are going to create a custom TCP rule to allow port 8888 in the security group.

I allowed all IP to connect. However this is not a safe rule, as explained by François Chollet:
This rule can either be allowed for your current public IP (e.g. that of your laptop), or for any IP (e.g. 0.0.0.0/0) if the former is not possible. Note that if you do allow port 8888 for any IP, then literally anyone will be able to listen to that port on your instance (which is where we will be running our IPython notebooks). We will add password protection to the notebooks to migitate the risk of random strangers modifying them, but that may be pretty weak protection. If at all possible, you should really consider restricting the access to a specific IP. However, if your IP address changes constantly, then that is not a very pratical choice. If you are going to leave access open to any IP, then remember not to leave any sensitive data on the instance.
Create an environment for GPU anaytics
We are done with the Jupyter set-up. Let’s create an environment, install JupyterLab and all the RAPIDS libraries.
(base) ubuntu@ip-10-0-10-124:~$ conda create -y -n rapids python=3.7
(base) ubuntu@ip-10-0-10-124:~$ conda activate rapids
(rapids) ubuntu@ip-10-0-10-124:~$ conda install -y jupyterlab
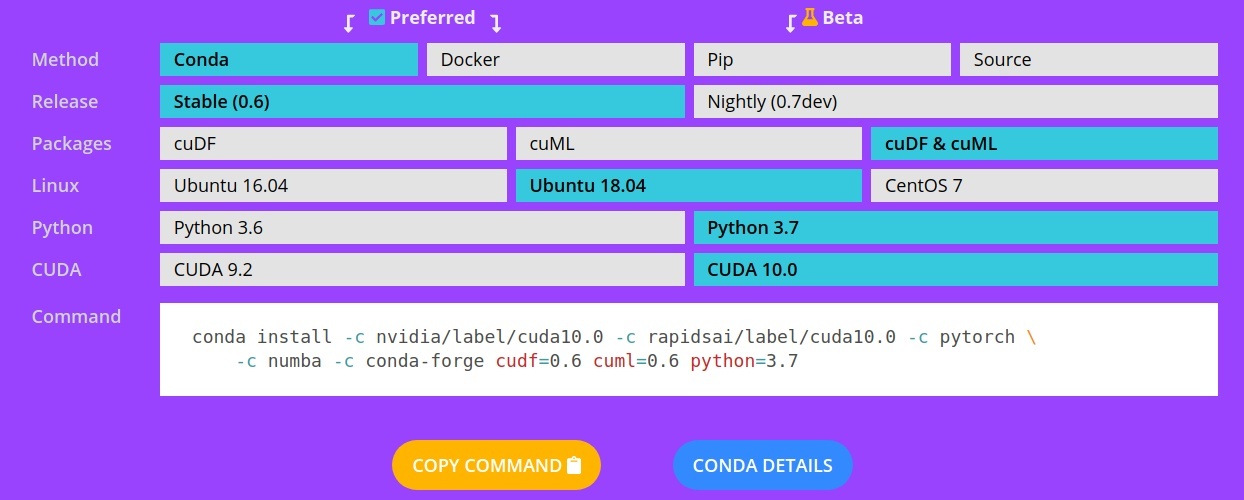
In order to install them, we get the command line from the RAPIDS GET STARTED page:

We install cuDF and cuML, along with pymapd (Python client for OmniSci) and cudatoolkit:
(rapids) ubuntu@ip-10-0-10-124:~$ conda install -c nvidia/label/cuda10.0 -c rapidsai/label/cuda10.0 -c pytorch \
    -c numba -c conda-forge cudf=0.6 cuml=0.6 python=3.7
(rapids) ubuntu@ip-10-0-10-124:~$ conda install -c conda-forge pymapd
(rapids) ubuntu@ip-10-0-10-124:~$ conda install cudatoolkit
Here are a few of the packages along with their version number installed in our environment (cuda list):
# packages in environment at /home/ubuntu/anaconda3/envs/rapids:
#
# Name                    Version                   Build  Channel
arrow-cpp                 0.12.1           py37h0e61e49_0    conda-forge
cudatoolkit               10.0.130                      0
cudf                      0.6.1                    py37_0    rapidsai/label/cuda10.0
cuml                      0.6.1           cuda10.0_py37_0    rapidsai/label/cuda10.0
libcudf                   0.6.1                cuda10.0_0    rapidsai/label/cuda10.0
libcudf_cffi              0.6.1           cuda10.0_py37_0    rapidsai/label/cuda10.0
libcuml                   0.6.1                cuda10.0_0    rapidsai/label/cuda10.0
libcumlmg                 0.0.0.dev0         cuda10.0_373    nvidia/label/cuda10.0
numba                     0.43.1          np116py37hf484d3e_0    numba
numpy                     1.16.3           py37he5ce36f_0    conda-forge
pandas                    0.24.2           py37hf484d3e_0    conda-forge
parquet-cpp               1.5.1                         4    conda-forge
pyarrow                   0.12.1           py37hbbcf98d_0    conda-forge
pymapd                    0.11.2                     py_0    conda-forge
python                    3.7.3                h5b0a415_0    conda-forge
thrift                    0.11.0          py37hf484d3e_1001    conda-forge
thrift-cpp                0.12.0            h0a07b25_1002    conda-forge
Launching JupyterLab
Well everything seems to be ready to launch Jupyter Lab. We start by c:reating a folder for the notebooks:
(rapids) ubuntu@ip-10-0-10-124:~/.jupyter$ cd ~
(rapids) ubuntu@ip-10-0-10-124:~$ mkdir Notebooks
(rapids) ubuntu@ip-10-0-10-124:~$ cd Notebooks
(rapids) ubuntu@ip-10-0-10-124:~/Notebooks$ jupyter lab
However, on the my local machine (not the AWS remote one), I tried to enter the following address in the browser https://ec2-34-243-80-83.eu-west-1.compute.amazonaws.com:8888 and got a time out error… I found out there was an issue with the file owner of the cert files and some other Jupyter user files:
(rapids) ubuntu@ip-10-0-10-124:~/Notebooks$ sudo chown $USER:$USER ~/certs/cert.pem
(rapids) ubuntu@ip-10-0-10-124:~/Notebooks$ sudo chown $USER:$USER ~/certs/cert.key
(rapids) ubuntu@ip-10-0-10-124:~/Notebooks$ sudo chown -R $USER:$USER /run/user/1000/jupyter/
This kind of issues is rather confusing and I am glad I could find similar issues on some web sites…
After this little unfortunate experience, I could eventually launch juputer lab from the browser. Don’t be surprised if you get at first a “your connection is not private” warning.

As explained by François Chollet:
This warning is simply due to the fact that the SSL certificate we generated isn’t verified by any trusted authority (obviously: we just generated our own). Click “advanced” and proceed to navigate, which is safe.
We finally get to enter the password created above (Create a password for Jupyter):

We can now proceed to a very basic test of the GPU stack.
DB query to GPU memory via cuDF
Let’s check that the GPU is ready:
!nvidia-smi
Mon May  6 13:53:16 2019
+-----------------------------------------------------------------------------+
| NVIDIA-SMI 418.39       Driver Version: 418.39       CUDA Version: 10.1     |
|-------------------------------+----------------------+----------------------+
| GPU  Name        Persistence-M| Bus-Id        Disp.A | Volatile Uncorr. ECC |
| Fan  Temp  Perf  Pwr:Usage/Cap|         Memory-Usage | GPU-Util  Compute M. |
|===============================+======================+======================|
|   0  Tesla V100-SXM2...  On   | 00000000:00:1E.0 Off |                    0 |
| N/A   31C    P0    33W / 300W |      0MiB / 16130MiB |      3%      Default |
+-------------------------------+----------------------+----------------------+

+-----------------------------------------------------------------------------+
| Processes:                                                       GPU Memory |
|  GPU       PID   Type   Process name                             Usage      |
|=============================================================================|
|  No running processes found                                                 |
+-----------------------------------------------------------------------------+
Also we need to start the OmniSci server:
!sudo systemctl start omnisci_server
!systemctl status omnisci_server
● omnisci_server.service - OmniSci database server
   Loaded: loaded (/lib/systemd/system/omnisci_server.service; disabled; vendor preset: enabled)
   Active: active (running) since Mon 2019-05-06 14:09:22 UTC; 7s ago
 Main PID: 3623 (omnisci_server)
    Tasks: 26 (limit: 4915)
   CGroup: /system.slice/omnisci_server.service
           ├─3623 /opt/omnisci/bin/omnisci_server --config /var/lib/omnisci/omnisci.conf
           └─3648 -Xmx1024m -DMAPD_LOG_DIR=/var/lib/omnisci/data -jar /opt/omnisci/bin/calcite-1.0-SNAPSHOT-jar-with-dependencies.jar -e /opt/omnisci/QueryEngine/ -d /var/lib/omnisc

May 06 14:09:22 ip-10-0-10-124 systemd[1]: Started OmniSci database server.
We import pymapd and create the connection to OmniSci:
from pymapd import connect

con = connect(user="mapd", password="HyperInteractive", host="localhost", dbname="mapd")
Let’s query the flights_2008_7M database (loaded in the last post) and load the result of the query into a GPU dataframe (with select_ipc_gpu: Execute a SELECT operation using GPU memory):
query = "SELECT flight_year, flight_month, flight_dayofmonth, flight_dayofweek, deptime FROM flights_2008_7M LIMIT 1000;"
gpudf = con.select_ipc_gpu(query)
print(gpudf)
    flight_year  flight_month  flight_dayofmonth  flight_dayofweek  deptime
0         2008             1                 11                 5     1705
1         2008             1                 11                 5     1040
2         2008             1                  4                 5     1028
3         2008             1                 11                 5     1048
4         2008             1                 25                 5     1605
5         2008             1                  9                 3     2128
6         2008             1                  4                 5     1104
7         2008             1                  4                 5     1751
8         2008             1                 12                 6     1007
9         2008             1                 23                 3     1852
[990 more rows]
type(gpudf)
cudf.dataframe.dataframe.DataFrame
The data is correctly loaded from the OmniSci DB to the cuDF GPU dataframe!
In the next episode, we are going to look at row-wise user defined functions, both on cuDF and Pandas dataframes.